Help & Documentation
Installation
EP Toolkit is available for Windows 10+, macOS 12+ (Intel and Apple Silicon), and Linux. Download the latest version from the homepage.
- Windows: the
.exeinstaller is unsigned. So expect a warning from SmartScreen. Alternatively, you can install EP Toolkit directly from the Microsoft Store. - macOS: open the
.dmgand drag EP Toolkit to your Applications folder. - Linux: download the
.AppImageand make it executable withchmod +x EPToolkit-X.X.X-x86_64.AppImage, then run it.
Connection
EP Toolkit communicates with Teenage Engineering devices via MIDI SysEx over USB. The app automatically detects your device when it’s connected.
Supported devices:
 EP-133 K.O. II (64mb and 128mb versions)
 EP-1320 Medieval
 EP-40 Riddim
The connection status is shown at the bottom of the sidebar: a orange dot means connected, and a gray dot means not connected. When connected, the status bar also shows the device name and firmware version.
Troubleshooting
- Make sure your device is powered on and connected via a USB data cable (charge-only cables won’t work). Also avoid cheap USB hubs or cables of questionable quality.
- Close other MIDI apps - DAWs, MIDI editors, or similar software can prevent EP Toolkit from detecting your device.
- Try unplugging other MIDI controllers or interfaces, as having multiple MIDI devices connected can sometimes cause conflicts.
- Open and close the app, or try restarting the device while the app is open.
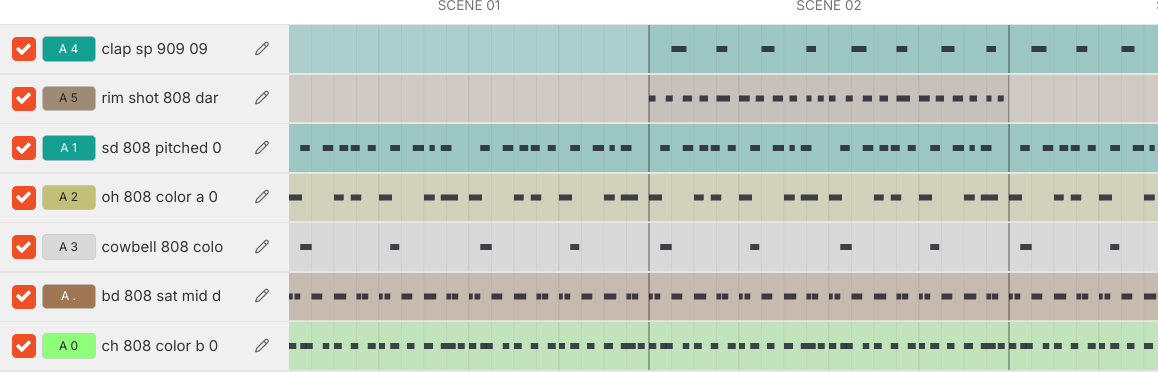
Projects
The Projects page shows all 9 project slots on your device in a grid layout. The page header contains three action buttons:
- Backup all projects - creates a full device backup (
.pak), fully compatible with EP Sample Tool. On the first backup, the app will ask for the backup folder location. You can change this later in Settings. - Load from backup - opens a saved backup file to view projects and samples. Supports
.ppakfor single projects and.pakfor full device backups. - Download all projects - downloads all 9 projects from the device to app memory one by one. It will take about 10 seconds, so be patient.
Project Card
Each project card represents one project slot on your device and shows the following information:

- BPM and time signature - shown below the project name (e.g. 123 BPM | 4/4).
- FX type - the master effect applied to the project (e.g. RVB, DLY).
- Stats - three counters showing the number of Scenes, Pads, and Samples used in the project.
Each card has three action buttons:
- Reload - re-downloads the project data from the device. Useful if you have made changes on the device and want to refresh the project in the app.
- Backup - saves this single project as a
.ppakfile. - Export - opens the export page to convert the downloaded project to a DAW format. The Export button is only available after the project has been downloaded or when a project was loaded from a backup.
Export
Export your EP projects to popular DAW formats. Click Export on a downloaded project card to open the export page.
Supported formats:
 Ableton Live 11+ - Simpler instruments with samples, envelopes, Drum Rack support, session clips or arrangement, grouped tracks, fader automation, scene names, and FX return tracks.
 DAWproject (Bitwig, Cubase, etc.) - arrangement with clips and notes, scene/clip launcher, per-track volume/pan, samples in folder.
 Standard MIDI - SMF Type 1 with per-pad tracks, tempo, time signature, velocity, CC automation, samples in folder.
 REAPER - arrangement with ReaSamplOmatic5000 sampler instruments, MIDI items, track grouping.
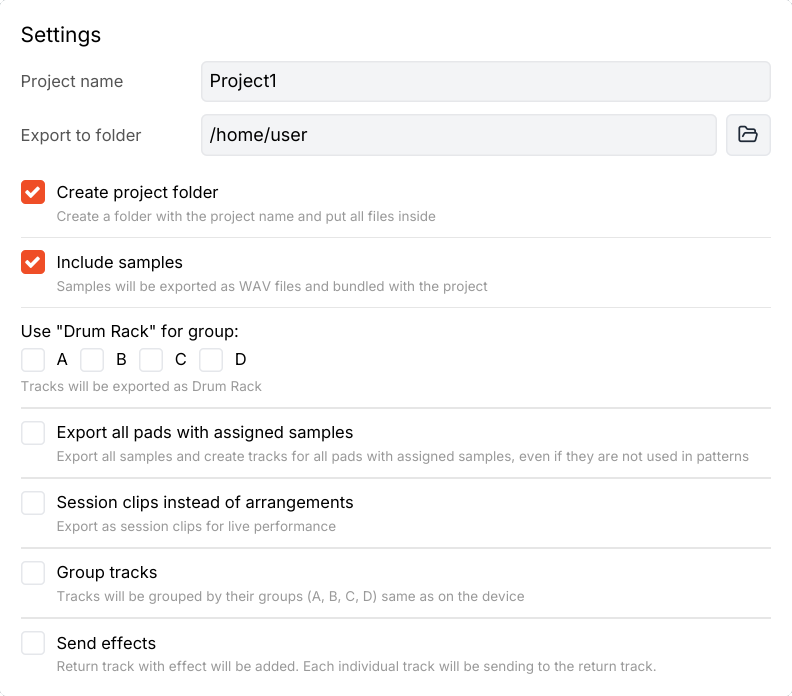
DAW Settings
Each format has specific options you can configure before exporting:
- Project name and export folder - where to save the output.
- Create project folder - a subfolder with the project name will be created inside the export folder, and all files will be saved there. If disabled, files will be saved directly to the export folder.
- Include samples - downloads samples from the device and bundles them with the export.
- Drum Rack (Ableton) / Merge tracks - combine all pads in a group into a single drum instrument track. In this mode all notes will be spread across the same track, with different MIDI notes triggering different samples. Make sure that pads in the merged group are not played chromatically (KEY mode).
- Session clips - export to session/launcher view instead of arrangement timeline.
- Group tracks - organize tracks into groups by pad group (A/B/C/D). In this mode fader automation will be applied to a group, not individual tracks.
- Send effects - include return tracks with delay, reverb, distortion, chorus, filter, and compressor effects mapped from the device. This is different from how effect bus works on the device, where the fader controls dry/wet mix of the effect. In the exported project, the effect will be on a separate return track with 100% wet mix, and the fader automation will control the send level to that track.
Arrangement
The arrangement view lets you review and customize the export before generating files:
- Scenes - select which scenes to include and rename them.
- Tracks - enable/disable individual tracks, rename them, and assign colors using the Ableton color palette. Click on the pad badge to open the color picker.

Device Parameters (Faders)
Each device group (A/B/C/D) can have up to 12 fader parameters. Static values are baked into the exported project as initial settings. If a fader is automated (recorded fader movements), automation envelopes are generated for each format (except REAPER).
| Parameter | Ableton Live | DAWproject | MIDI | REAPER |
|---|---|---|---|---|
| LVL | Track Volume | Track Volume | CC 7 | Track VOLPAN |
| PAN | Track Pan | Track Pan | CC 10 | Track VOLPAN |
| PTC | Simpler Transpose | Transpose | - | - |
| TUN | Simpler Fine Tune | CC 76 | CC 76 | - |
| LPF | Simpler Filter Freq | CC 74 (Cutoff) | CC 74 | - |
| HPF | Simpler Filter Freq | CC 71 | CC 71 | - |
| FX | Track Send Level | CC 91 (Reverb Send) | CC 91 | - |
| ATK | Simpler Attack Time | CC 73 | CC 73 | VST state |
| REL | Simpler Release Time | CC 72 | CC 72 | VST state |
| MOD | Simpler Pitch LFO | CC 1 (Mod Wheel) | CC 1 | - |
| VEL | Note Velocity | CC 107 | CC 107 | - |
| TIM | - | CC 105 | CC 105 | - |
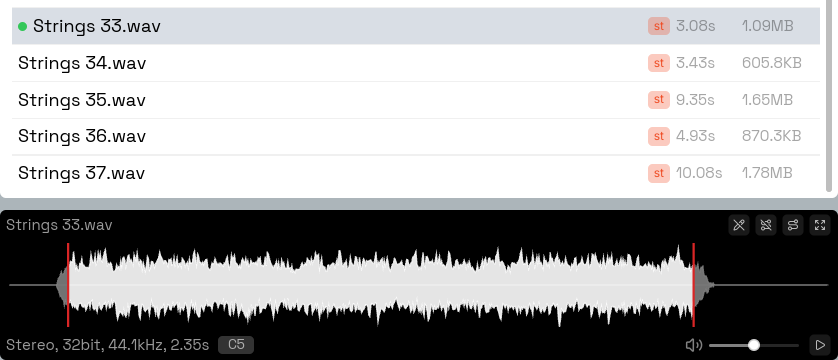
Samples
The Samples page has a dual-panel layout: local files on the left, device samples on the right.
Left Panel (Local Files)
Select a folder on your computer to browse .wav files. The app scans folders recursively, supports up to 1,000 files, and skips files larger than 128 MB.
- Click a file to select and preview it.
- Use Ctrl+Click (or Cmd on macOS) for multi-select, Shift+Click for range select.
- Drag files from the local panel to the device panel to upload.
- The waveform viewer shows an interactive waveform. Click the expand button on the waveform card to open the bigger waveform viewer.
- Detected pitch/key is shown as a badge (e.g. C4). The software sampler keyboard (keys Z–M) lets you preview local files at different pitches.
- Space toggles play/stop for the selected file.
Right Panel (Device Samples)
When a device is connected (or a backup is loaded), this panel shows all samples on the device with their slot number, name, duration, and file size.
- Use the range filter (001–999) to narrow down visible samples by slot range.
- Project badges (e.g. P1, P3) show which projects reference each sample. Project badges appear only for downloaded projects!
- Click a sample to preview it (triggers 1-second playback on the device).
- Double-click or use the context menu to rename samples (up to 16 characters).
- The waveform viewer shows play mode (OneShot/Key/Legato), root note, and audio metadata. Remember that changing the play mode or root note will not affect the samples that are already assigned to pads in the projects.
Copy Samples
Upload (Local → Device): drag and drop files from the left panel or from your OS file manager onto the device panel. A confirmation dialog will show smart options:
- Mix down to mono - stereo files are mixed to mono to save device storage.
- Trim silence - removes leading silence using -50 dBFS detection.
- Normalize levels - peak-normalizes to 0 dBFS.
Download (Device → Local): right-click selected samples and choose “Download”. Files are saved as .wav with the pattern 001 Kick.wav.
Move/Cut & Paste: right-click > Cut to copy samples to an internal clipboard, then right-click on a target slot > Paste to move them.
Processing the samples

There a few options to process the samples.
- Trim - set the start point and end point of the sample, and the app will trim the audio accordingly when uploaded to the device.
- Process with CLAP plugins - the app has a built-in CLAP host with support for third-party plugins.
After processing, you can drag and drop the samples to a device slot. Processed samples are marked with green dot and are stored in a temporary folder.
- - open the expanded waveform view
- - open the plugin dialog
- - reset the sample to its original state
- - reset trim points to the full sample length
Processing with CLAP plugins
Processing via CLAP plugins is EXPERIMENTAL.
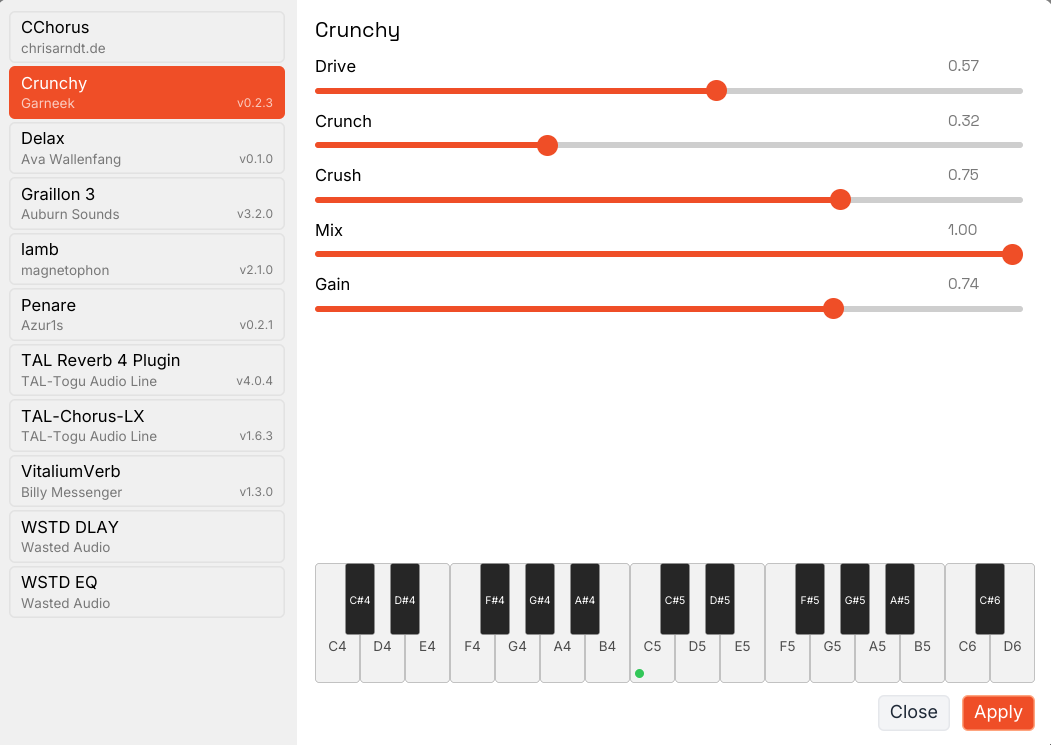
The app has a built-in CLAP host with support for third-party plugins. The CLAP plugin format is an open standard that is gaining popularity as a modern alternative to VST. You can find free and paid CLAP plugins online, covering a wide range of audio processing tools like EQs, compressors, limiters, transient shapers, tape emulations, and more.
Check the websites like CLAPDB or KVR Audio for available plugins.
There a few limitation to keep in mind when using CLAP plugins:
- Currently EP Toolkit does not support plugin GUI, you can only tweak the plugin parameters in the dialog.
- There is no plugin chain, like in your DAW. You can only apply one plugin at a time.
- When processed, there is no way to re-apply the same plugin with different settings without resetting the sample first. So if you want to try different settings - reset the sample.
Green dot on the keyboard is the detected root note of the sample.
Sound Processing on device
Right-click on device samples to access processing options:
- Trim silence - downloads, trims leading silence, and re-uploads.
- Normalize - downloads, peak-normalizes, and re-uploads.
- Convert to mono - downloads, mixes stereo to mono, and re-uploads.
Backups
Backups are complete archives of your device data stored as .pak (full device) or .ppak (single project) extension. They are essentially ZIP files.
- Backup all projects - creates a full device backup including all 9 projects and all samples.
- Backup single project - backs up one project and samples that are used in it.
- Load from backup - opens a backup file and loads all projects and samples for offline viewing, export, and sample browsing.
You can configure the default backup folder in Settings.
Settings
Configure application preferences from the Settings page:
- Appearance - UI scale (80%–150%).
- Upload defaults - pre-select processing options for sample uploads: mix down to mono, trim silence, normalize levels. These options are applied by default but can be toggled in the confirmation dialog before each upload.
- General - check for updates on startup, confirm before deleting samples, auto-download projects on device connect.
- Backup - default folder for backup files.
About
The About page provides:
- Software version - shows the installed version, build number, and update status. Click “Check for updates” to manually check. Enable auto-check in Settings to get notified on startup.
- Changelog - view what’s new in the current and previous versions.
- License - activate a license key received via email after purchase. The app works in demo mode without a license, with main features restricted.
- Feedback - report errors or send feedback directly to the developer. You can attach project files to help diagnose issues.
- EULA - view the software license agreement.